RSAG7.820.10229 LED TV Board
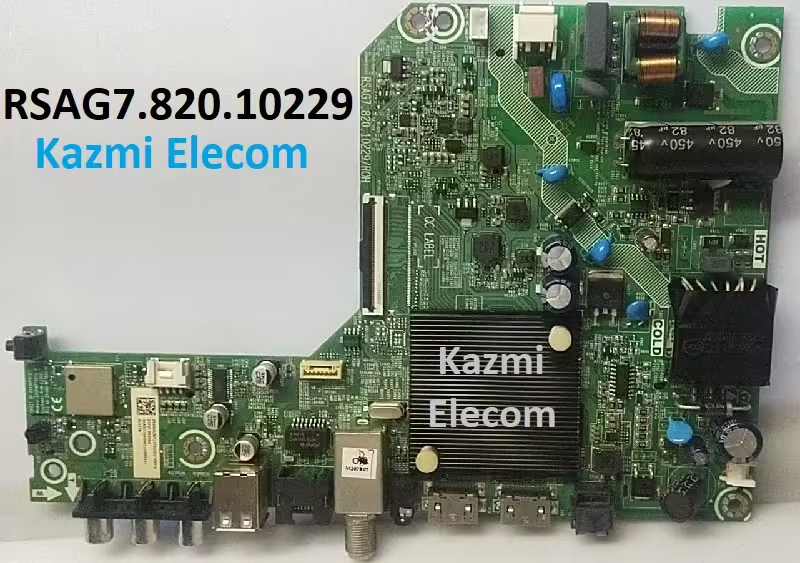
RSAG7.820.10229 is a smart LED TV board. Its supported resolution is 1080P 1920×1080. This board is mostly used for Hisense and Devant brands. It is a non-android board. VIDDA smart operating system is installed into this motherboard. This is a Combo board which means the main input power supply board as can be seen in the picture below, the backlight inverter module, and the cable TV tuner are built on a single piece of printed circuit board (PCB). This board has built many apps like YouTube, Netflix, Kids YouTube, Prime Video, and Vidaa Art. It also has the Vidaa store option to download apps.
RSAG7.820.10229 can support the sharing of context and screen with external devices. It has multiple input-output interfaces such as LAN (Local Area Network) connection RJ45 Ethernet socket interface for wired internet connectivity to work smooth and fast internet browsing. Dual HDMI slots for connecting Full HD devices, Dual USB inputs for software upgrades and connecting USB devices, and Component input interface for connecting Analog devices. It has an optical output port. It also has a headphones output interface jack of 3.5mm, and a cable tv tuner.
RSAG7.820.10229 General Information:
Board Model: RSAG7.820.10229/ROH
Processor: MediaTek
CPU: 1.0GHz
GPU: Dual-Core MALI-400
Operating System: VIDAA6
Android Version: NA
Resolution: 1366×768/1920×1080
Audio Power: 2x8W (16 watt 8 ohm)
Backlight Current: NA
Backlight Power: NA
USB Ports: 2
HDMI Ports: 2
CI: No
PC Input: No
Component: Yes
RJ45: Yes
Analog Tuner: Yes
Digital Tuner: DVB
Wifi: Yes
Mira-Cast: Yes
SPDIF OUT: Yes
Memory (RAM): 512 Mb
Storage (ROM): 4 GB EMMC Flash
EMMC:
Power Rating: 100V~240V 50/60Hz
Power Consumption: 70Watt
Firmware Name: usb_MTK_DEV_SA.bin
Firmware Type: EMMC Backup Dump and USB bootable
Product User: Hisense
RSAG7.820.10229 Technical Specifications:
- Operative System VIDDA6
- Browser Odin 88
- Display 1366×768 and 1920×1080
- RAM/ROM 512 MB /4G Byte ROM
- HDMI ports 2
- MHL enabled Yes
- HDMI Support MHL & ARC
- Ethernet sockets 1
- USB ports 2
- USB supports Audio, Video, Image
- Cable Port Yes
- SPDIF Yes
- A/V IN Yes
- PC Input No
- Headphone speaker output ports 1
- Refresh rate 60 Hz
- Resolution 1080P
- Image formats supported BMP, GIF, JPEG, PNG
- Analog TV reception formats PAL, NTSC, SECAM
- Video formats supported MKV, MPEG, MPEG-1, MPEG-2, MPEG-4
- Upscaling No
- Audio formats supported AAC, AC3(Dolby Digital), MP2, MP3, PCM
- Audio Features 5 Band Equalizer, Auto volume leveler: Balance, Dolby Atmos
- No. of speakers 2
- Total speaker output 16 W
- Output per speaker 8 W
- Sound type Mono
- Bluetooth Optional (not builtin)
- Processor Type Quad Core
- Screen Format 4:3 / 16:9 / Auto / Zoom 1 / Zoom 2
- Inbuilt apps Yes
- Wi-Fi Yes
- Internet Link 2.4GHz WiFi 802.11 b/g/n 2T2R, Ethernet Network
- Remote Type RF (Radio frequency)
- Miracast screen mirroring support Yes
- Voltage requirement 100 – 240V 50/60HZ
- Inbuilt apps YouTube, Netflix, Prime Video, Kidz YouTube, Facebook, Magic TV, VIDDA Art, etc
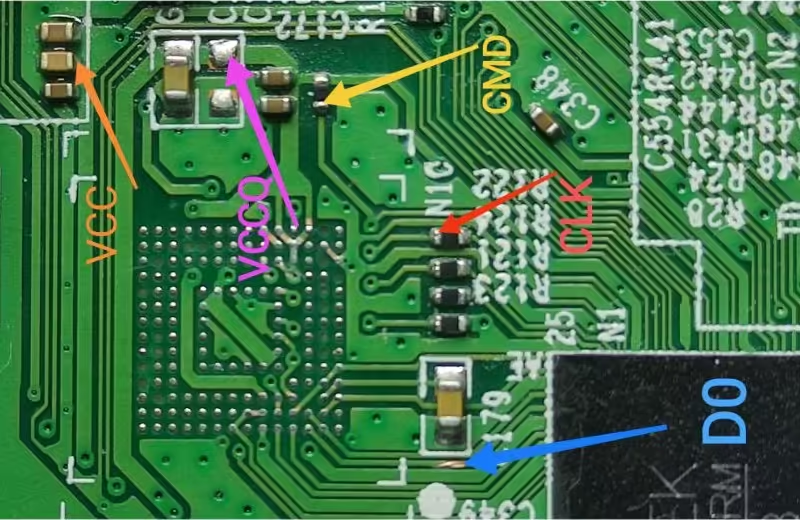
How to Write RSAG7.820.10229 EMMC Backup:
- Download the given RSAG7.820.10229 EMMC backup shared in this post below
- Note the EMMC Pinouts in the given picture above
- Jtag the mainboard with the Programming Tool
- Write the EMMC data
- Done.
How to Install USB Bootable Firmware:
- Download the required RSAG7.820.10229 USB bootable firmware.
- Extract the zip files to get the folder.
- Transfer the firmware (usb_MTK_DEV_SA.bin) file to the empty FAT 32 formatted USB disk
- Switch OFF the TV/Board from the main power
- Insert the pen drive into the USB port of the board
- It will start automatically after powering on the TV otherwise keep pressing the power button of the board keypad and switch on the TV
- The installation progress bar will display on the screen. Now release the power button
- Wait till completion. Done
Note: The following RSAG7.820.10229 firmware is USB bootable and a backup dump file. Kazmi Elecom Team is not responsible for any type of damage/loss as a result of uploading/downloading the firmware. First, check and verify the main board then install software. If you are new and do not have enough knowledge of loading/installing software/firmware or dump files, or facing any issues during firmware installation then visit and read here first.
RSAG7.820.10229 Firmware files for free download:
![]()
