M6V5.2 Universal Board
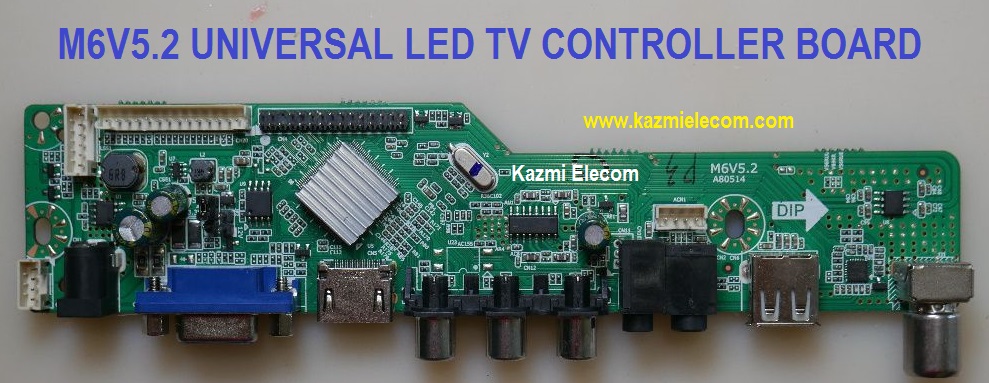
M6V5.2 is a universal LCD/LED TV Controller board. All the information regarding software and specifications is given in this post. If you are facing any issues during firmware installation then visit and read here first.
Basic Info:
- Model No. M6V5.2
- Main Chipset: MSD3663LSA
- Trademark:
- Display Format: up to 1920×1200 @ 60Hz
- Aspect Ratio: 4:3, 16:9 & 16:10

General Specifications:
TV System: PAL/SECAM/NTSC DVBT2
Panel Interface: Single channel or Dual channel 6/8 bit LVDS
Key Button Functions: CH-/CH+/MENU/VOL-/VOL+Souce/Power
Multi-Language OSD: Yes
Input/Output Ports: HDMI, VGA, AV, USB, RF TV interface, and Earphone Out
Audio O/P Power: 2 x 3 Watt (8 ohms)
Panel Voltage: +3.3V/+5V/+12V DC (jumping cap setting)
USB Port: Yes for Firmware Upgrade and Multimedia Playback Support also
IR Control: Yes (Controllable by Remote Control)
Electrical Parameters:
Working Input Voltage: DC +12 Volt
Maximum Current: 2000mA (Without Panel)
Standby Power: <0.2W (for the motherboard only)
Maximum Current for USB: 500mA
How to Upgrade Firmware:
Step 1: Empty the U disk
Step 2: Copy the corresponding resolution program to the U disk based on your screen size.
Step 3: Connect the U disk with the Mainboard
Step 4: Connect the Keyboard and TV Mainboard
Step 5: Connect the power supply, check the keyboard light. If there is a flashing light, that is in the written program, waiting for the light to turn to Green, work is done. If there is no flashing light, please cut off the power supply, then connect the USB once again, then connect the power supply again,
Factory Service Mode:
Source/Input 2580
Note: The following firmware is USB bootable and a backup file that can be loaded by a programming tool. Kazmi Elecom Team is not responsible for any type of damage/loss as a result of uploading/downloading the firmware. First, check and verify the main board then install software. If you are new and do not have enough knowledge of loading/installing software/firmware or dump files, or facing any issues during firmware installation then visit and read here first. Always keep a backup before writing the flash.
M6V5.2 Firmware All resolutions USB updateable for Free Download:
![]()


