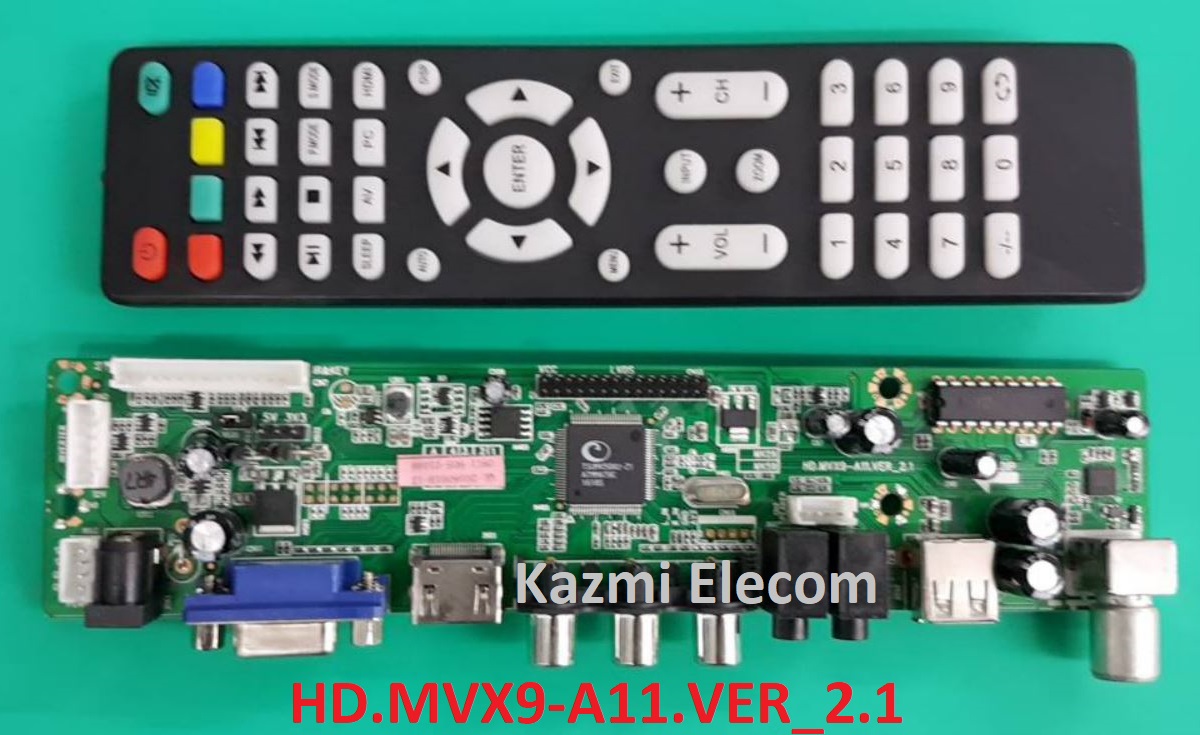
HD.MVX9-A11 Universal Board
HD.MVX9-A11 is a universal jumper board with multi-resolution panel screen-supported software. This is a non-combo board means no power supply module is built-in in the motherboard. So, a separate power supply of DC 12 V will be required to get it operational. A fixed power supply module is required that can be AC to DC power Kit module or DC Adapter. This board supports all the essential connectivity interfaces for the user’s requirements.
Basic Info:
Model No. HD.MVX9-A11
Hardware Version: 2.1
Main Chipset: TSUMV59
Display Format: up to 1920×1080
Aspect Ratio: 4:3, 16:9 & 16:10
Tuner: NA
Sound: 1517P
Bin Name: NA

General Specifications:
TV System: PAL/SECAM/NTSC
Panel Interface: Single-channel or Dual-channel LVDS
Key Button Functions: CH-/CH+/MENU/VOL-/VOL+Souce/Power
Multi-Language OSD: Yes
Input/Output Ports: HDMI, VGA, AV, USB, RF TV interface, and Earphone Out
Audio O/P Power: 2 x 3 Watt (8 ohms)
Panel Voltage: +3.3V/+5V/+12V DC (jumping cap setting)
USB Port: Yes (Firmware Upgrade and Multimedia Playback Support)
USB File Format: Audio (Mp3, wma, m4a/aac), Video (avi, mp4, ts/trp, mkv/mov, mpg, dat, vob, rm/rmvb), Picture (Jpg, jpeg, bmp, png), Text (text)
IR Control: Yes (Controllable by Remote Control)
Electrical Parameters:
Working Input Voltage: DC +12 Volt
Maximum Current: 2000mA (Without Panel)
Standby Power: <0.2W (for the motherboard only)
Maximum Current for USB: 500mA
How to Load USB Firmware:
- Copy the Required Firmware/software into the FAT32 USB Disk
- Plugin the U disk into the Mainboard USB port of the LCD/LED TV
- Switch ON the power and Wait until even the IR indicator LED stops flashing
- Done. Unplug the U-disk (It will take a maximum of half min to upgrade firmware)
Caution:
All the pictures given in this post are for reference only. If you are a user and do not have any experience of repairing then it is better to visit the nearest technician first without loading the software/firmware. Sometimes, the fault is different as per the visual observations. So, please do not try it at home.
Factory Service Mode:
Menu+1147
Pros:
There are many advantages to installing the given HD.MVX9-A11 USB software or backup dump file. A few benefits are described below:
- The dead board can be recovered and operational by loading the given software backup file
- Remote and Logo may change at your own choice to satisfy the customer
- Money saving instead of changing the mainboard
- Time-saving instead of arranging a new board
- Customer satisfaction to do an urgent job
- Skill and confidence improvement
Cons:
There may be some disadvantages to installing the given HD.MVX9-A11 USB software or backup dump file. But it depends on the technician or user, as per his understanding. A few drawbacks are described below:
- The working board may go to the standby position
- Remote Control may not work and the Logo may change by writing the given software
- Panel screen parameters may be changed
HD.MVX9-A11 Version Upgrade:
Please note that the installed version in this board is the final version. So, no need to upgrade the software if the board is working normally. Only if the default software malfunctions due to some bugs will the manufacturer provide the software update. Otherwise, no version update is issued.
HD.MVX9-A11 Board Replacement:
If the board is completely dead and no chance to repair then replace the same board as already installed. And if the same board is not available on the market then search for the board that has the same specifications and latest features to avoid any difficulties. If the backlight module is faulty in the combo board then you can install only the backlight module separately then no need to change the whole board.
Note: The following firmware is a backup file. Kazmi Elecom Team is not responsible for any damage/loss caused by uploading/downloading the firmware. First, check and verify the main board then install software. If you are new and do not have enough knowledge of loading/installing software/firmware or dump files, or facing any issues during firmware installation then visit and read here first. Always keep a backup before writing the flash.
How to Download:
Download your required resolution firmware/software and then extract it, you will get the folder. Now copy the files to USB or write flash by a programmer. For more Details about the download process watch the video Click Here
HD.MVX9-A11 Firmware Free Download:
![]()
For video tutorials, visit “Kazmi Elecom” on my YouTube channel.


Thank u
Thank u no download
links shared